Becoming a great developer requires a deep understanding of the tools you use. Our learners know that and will often ask us to explain more. That's not always easy. Understanding something is one thing, explaining them effectively to another human being is another thing altogether.
Take Git for example. Most of us know how to use Git for day-to-day version control. But, how well do you really understand Git? What exactly goes on under the hood? And how would you explain that to someone else, without them getting utterly confused?
Hackership Coach Carl Crowder was tasked with untangling this complex system and creating a workshop that clearly explains the inner workings of Git to our learners. He came up with a highly interactive approach and one of the most successful workshops during Batch 14-07 in Berlin. Inspired by this workshop Stefan Wille and I extended Carl's approach during our latest Batch of Hackership in Gran Canaria. The resulting workshop yielded better results than we could have ever imagined.
Now, we would like to share exactly what we did to effectively explain advanced Git to experienced programmers. What follows is essentially a how-to guide, helping you to host a similar workshop for your community. This guide is meant for people who already understand Git (at a deeper level), but are looking for a new way to teach it to others.
Dancing Git
Basics Idea
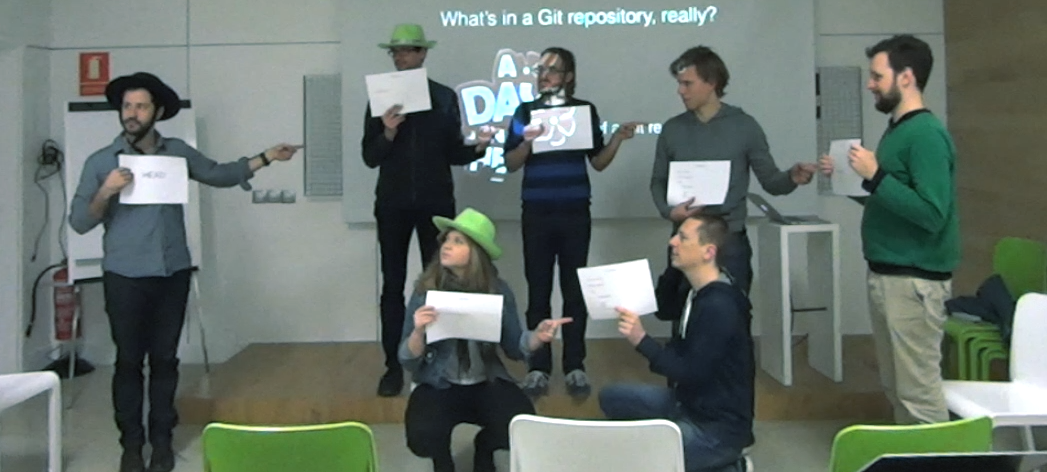
Our basic idea was to recreate the life of a Git-repo and what goes on inside the .git-folder when various commands are executed. We used our learners as git objects. Some of them would play the role of a commit holding a tree and pointing to their predecessors, others would be a variable pointing to another object. We gave pointers hats of different colors to represent the abstracted git pointers like head, branches and tags.
What you will need
three types of hats (maybe even put a sign on the hat)
- one hat
head - three hats for branches
- one hats for a tag.
- one hat
a print out of our Git Trees for the sandwhich recipe we are compiling
learners
(at least) one coach
Here is how you do it
Please take a look at this video recording to get an idea on how to assemble the git repo, step by step while explaining one concept after each other.
Note: As you probably observed, there's a lot of talking going on throughout the exercise. That's on purpose. Allowing people to interact is a good way for everyone to make sure thet understand what is going to. You should encourage learners to ask questions. Also, when newer things happen and new actions are introduced, ask participants to figure out where the new thing is supposed to go, rather then just telling them.
For the record (and for you to not forget anything), here is the script:
Simple Repo
- Empty repo
- Add
head(with hat) - Add
master(with hat),headpoints tomaster - explain: object pointers
- Add
first commit masterpoints tofirst commit- Add
second commit(pointing to its predecessor) - explain: branches are travelling references
masternow needs to point tosecond commit
Branching
- Add second branch (low on calories)
- Let learners figure out, where it is supposed to go, where things have to point
- Explain checkout to have
headpoint to newbranch - Add another commit
- Check out
masteragain - Add commit to master
Merging
- Add a
merge commit(merging low on calories into master) - Resolve the conflict with the new change
- Explain that the merge-commits has to predecessors
- Delete
branch
- Add a
Tagging
- Add a Tag (other type of head)
- Add another commit on master – I forgot the bread
- Explain that master moved on, but tags do not
'detached heads'
- checkout the commit (last one on low calories branch)
- Add another commit to this one
- explain what the problem is, when checking out
masternow - Checkout the tag and how this creates a detached head, too
Before everyone sits down again, make sure you answered any and all questions. There tend to be quite a few, so give everyone a chance to clear up any confusions they may have and to get familiar with all these new concepts. Once everyone understood it, make sure to take a break. The brain needs it!
We usually continue after the break by recapping what we just did using the actual git wording and giving some tips on naming, followed by explaining remotes and fetches using the great explain-git-with-d3-tool.
Finally, if you have the time, we found that holding a Git in Practice workshop a couple of days later is a great way to make sure everyone really understood what was going on and to improve retention.
That's it. Our Git workshop. Now it's your turn to host your own. Good luck! And please let us know if you have questions (check out the comments below). We're here to help!
You can find the entire video series here and the slides in this Git Repo.
This and all other learning material published by Hackership, is licensed under a Creative Commons Attribution 4.0 International License. Please go ahead and give this workshop. And if you have any feedback, please let us know.
